Friday, March 19, 2010

Jalapeno Cheese Bread

Sometimes a vegetable or two will end up in my crisper without being designated for a meal (I'm sure that happens to everyone. Right? right??). This week I had three lonely jalapenos with nowhere to go.
The other day I came across (another) beautiful cooking blog, Homemade by Holman, and what do you know, there was the most perfect recipe that called for the exact amount of jalapeno I had. It was meant to be.
This Cheddar Jalapeno Bread is easy to make and comes out beautifully, colorful, moist and tast-ay! We loved it, and I definitely think this will be the new chili partner in my house. I can't wait to make it with fresh jalapenos and peppers from the garden.
I made one alteration to the recipe, I had this delicious smoky chipotle cheese, and I used that instead of regular cheddar. mmmmm!

Jalapeno Cheddar Bread
Recipe adapted from Pink Parsley, originally from Savory Baking

2 cups all-purpose flour
2 tsp sugar
1 T baking powder
1 tsp freshly ground black pepper
1 tsp salt
1 cup shredded sharp cheddar cheese
1 cup milk (I used skim)
1/3 cup canola oil
1 large egg
3 jalapeno peppers, seeded and diced
1/2 cup green bell pepper, diced
1/2 cup roasted red pepper, diced

Preheat oven to 375 degrees. Spray an 8" x 4" loaf pan with baking spray.

In a large bowl, combine flour, sugar, baking powder, pepper, salt, and cheese. Toss together and make a well in the center. In a separate bowl, combine milk, oil, and egg and whisk together. Pour mixture into well in center of flour and stir mix together lightly with a wooden spoon. Add peppers and stir just until dry ingredients are all combined. The batter should be lumpy. Pour batter into prepared loaf pan.


Bake bread for approximately 45 minutes until golden brown. Bread should spring back when touched. Cool in pan for about 10 minutes, run a knife around all sides and turn out of pan. Cool completely on a wire rack.


Also, you'll want to go check Homemade by Holman's photos, as mine don't do this pretty bread justice. We cut into it while it was still hot so it didn't cut so well. But boy howdy was it delicious.

Wednesday, March 10, 2010

Shamrocks and gold! Cookies, that is.

Okay, so my adorable husband thought my "gold" cookies were lemons, but hey, I don't spend a lot of time around leprechaun gold so I did the best I could. This is only my third attempt at Royal Icing and I'm loving working with it more and more every time I try it.
I used my absolute favorite sugar cookie recipe from A Year in The Kitchen and the Royal icing recipe and tips from Annies Eats. I'm sure I'll never need another sugar cookie or icing recipe, as this is a most delicious combo (which usually isn't the case for highly decorated cookies).

I tried sprinkling sugar on a few, and I liked the look, but my poor arms were tired (and it was nearly 11pm) so I gave up. Those sprinkled ones went the fastest, though. People love sparkles! Also my pictures were taken at 6 am. That has nothing to with anything...I just wanted to share because the beginning of daylight savings is coming and with it comes the end of me being coherent at 6am!

Thursday, March 4, 2010

Irish Soda Bread


I had a small carton of buttermilk that I needed to use and I was trying to think of something clever to make (it was originally intended for red velvet cake, but then I suffered from a case of valentine goody burn out...) Fortunately, allrecipes.com came to the rescue and I found this recipe for Irish Soda Bread, very appropriate for this month!
I've never even had Irish Soda Bread, let alone made it from scratch, so I was surprised that there was no soda in- just baking powder. But I trusted the recipe and I'm glad I did, it's delicious!

Ingredients

  • 3 cups all-purpose flour
  • 2 teaspoons baking powder
  • 1/2 teaspoon salt
  • 1/2 cup white sugar
  • 1 1/2 cups buttermilk
  • 1/2 cup raisins
  • 2 eggs
  • 1 tablespoon caraway seed

Directions

  1. Preheat oven to 350 degrees F (175 degrees C).
  2. Combine flour, baking powder, salt, and sugar. Beat eggs with buttermilk. Add the eggs and buttermilk into the flour mixture; stir in raisins.
  3. Pour dough onto lightly floured board. Shape into a round loaf, adding flour if necessary. Place in a lightly greased springform pan. Sprinkle top with caraway seeds if desired.
  4. Bake at 350 degrees F (175 degrees C) for 1 hour or until the bottom of the loaf sounds hollow when tapped.

I didn't have a springform pan, so I just shaped it into a round shape and baked it on a cookie sheet. I did pull it out of the oven about 20 minutes in to brush the top with butter. Mmmm. butter.

I will definitely be making this simple but tasty sweet bread again in a few weeks to go with my corned beef! (no cabbage, though! blech!)

Monday, February 15, 2010

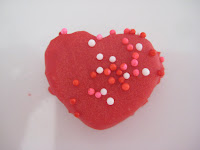
Heart shaped cake bites

I have resisted the cake pop/ball trend for this long because I have an unnatural fear of touching food that other people are going to eat. It's weird, I know. But I came up with a way to make these that thankfully had little touching involved!


1 box cake mix (I used strawberry)
1/2 can vanilla frosting
melting chips

Bake cake as directed and allow to cool. Crumble cake (I used forks to tear it up) into a bowl and stir in frosting. Place some batter on a glass plate and press to 1/2 inch thickness under plastic wrap. Use cookie cutter to cut small shapes from batter. Freeze shapes for at least 1/2 hour. Dip in melted chips and decorate.
Easy, tasty, and with minimal food to finger contact, just the way I like it :)

Enjoy!

Saturday, February 13, 2010

Valentine T for baby

This is my sweet nephew P's first valentine's day, and I wanted to make him something special. Considering he's only 7.5 months old, he can't have my cookies or cupcakes, so I made him a t-shirt.
First I bought a plain red T-shirt from Target and some black fabric with lips on it from JoAnn's. Then I sketched out a template of a necktie. I cut out the tie shape and sewed it on like an applique, trimming off the extra fabric when it was done.

I love it, and I can't wait to see it on his chubby little self!

Conversation Heart Cookies

Because everyone is doing it! Inspired by Annie over at Annie's Eats (have I mentioned her yet? That woman has my heart. Her pictures and food are beautiful and her recipes easy to follow. Go visit her now, it wont hurt my feelings!) I decided to attempt to make conversation heart sugar cookies.
Every season I forget how much I *hate* rolling out sugar cookies, and this time I figured out why, I'm impatient! I never wait for the dough to chill. After giving up on my cookies for 6 hours, I came back to perfectly chilled dough and easy to roll cookies. Doh!

Also, this is only my second attempt ever at royal icing. The first time I absolutely hated it, and swore never to do it again. This time I sat at the table and used Annie's Tips, and had a lot more fun. I will definitely be making royal iced cookies again and again.

I used this sugar cookie recipe, from a year in the kitchen, and Annie's Royal icing recipe. These are some of the best sugar cookies I've ever tasted! The lemon really makes them special.

I'm still a little impatient when it comes to decorating and I didn't wait until the base color was fully dry before writing on them, and my base color is pretty lumpy. Oh well, live and learn! I'll work on my technique for St. Patty's day! Also, I had the hardest time thinking of sayings to write! I didn't even think of "be mine", which is pretty much the ultimate Valentines day saying. It was 11pm, I'll blame my brain delete on that!

Friday, February 12, 2010

mmm, cupcakes


I needed a good reason to use the adorable Valentines sprinkles and cupcake wrappers that I got for 40% off at JoAnns, so I made these mini cupcakes for my mom for Valentines day. Aren't they adorable?!
I have more Valentines baking up my sleeve for this weekend, along with my first attempt at homemade pasta. What are yooooou doing for Valentines day?

Wednesday, February 10, 2010

It's a boy!

I just found out that my new nephew is boy! Unfortunately, that means I still don't have anyone to make ruffle butt onsies for, but I'm excited! Now I just need to find an equally cute boy project.

Thursday, February 4, 2010

Want.

I am in immediate need of two things:

1. A ruffle foot for my sewing machine
2. A girl baby

Why? Three words: Ruffle Butt Onsies!!!
I found this tutorial over at U create, it's a guest post from Crap I've Made (the photo is hers too!)

Aren't you in love with that onsie? And that chubby legged baby?! I am, and I'm crossing my fingers that the fetus my SIL is growing is a girl! (and yes, I just texted my SIL to see if she knew what it was yet. She doesn't. poo)

Still. I foresee many of these in my future. I just need to find some babies to put them on!

If you're in need for some crafty inspiration, check out U create and Crap I've Made . They are both beautiful blogs with tons of great ideas!

Tuesday, February 2, 2010

10 minute cookies


I'm not a gourmet cook,baker or eater. I don't make my own cheese and I've never had arugula. I eat what I like, and what I like is easy. Sometimes I debate (with myself) whether or not my recipes (like this one) are worthy of sharing with the blogosphere, and then I had an epiphany.

Sometimes, a girl just wants a cookie...NOW.

And a cookie you shall get! These take approximately three minutes to whip up from a box cake mix, and only 7 minutes to cook. Perfect for whipping up during the commercial break on Hulu on a lazy Sunday afternoon!

10 minute cookies

1 boxed cake mix (any flavor!)
1/3 c. oil
2 eggs

Mix all three (!!!) ingredients together. Roll into balls and roll in powdered sugar. Bake at 350 for 7-9 minutes. Eat all of them in one sitting.

Some of my favorite variations: Lemon cake mix with 2 tbs lemon zest mixed in. Chocolate cake mix with 1/2 c. nuts mixed in (pictured). Spice cake mix rolled in cinnamon and sugar.

Enjoy! And the fact these come from a box mix will be our little secret ;)


Monday, February 1, 2010

crochet hat

For Christmas I made my two year old nephew a crochet hat, but unfortunately I wasn't able to get a picture of it (so maybe I finished it in the car on the way to our Christmas celebration, I never said I was organized! :)
Yesterday my sister texted me this picture:

How stinkin' cute is that! I love his cheesy fake smile. Oh, and the hats cute too :)

I can't believe it's February already! This year is going to FLY by!

Sunday, January 24, 2010

The D word

It's true. And it's sad. Yep, I'm on a DIET, hence the lack of food related (or any, really) blog posts. I do have a bunch of posts I've been working on, but am waiting to find my camera cord to post (a bunch to me=3.)

In the meantime, while I eat this bran muffin, indulge your sweet tooth on this blog:

Tartlette

She makes the most beautiful cookies! Some version of macaron will be on my to-make list as soon as I shake this holiday weight ;)

Enjoy!

Monday, January 18, 2010

Muthtard!

I have a fabulous friend who is in lurve with the color mustard. So I decided to make her a mustard colored scarf!
It's still a work in progress, but here is a sneak peek at it's mustardy fabulousness


My friends mom is a knitter (I only crochet), and hearing that I was making M a scarf, she decided to make me one! I am in love with this scarf, and pretty jealous of her skills! It's absolutely perfect and soo soft. I plan to wear it often.


Chicken Provolone Roll Ups

I don't think I've mentioned much about my new favorite site, Tasty Kitchen. It's Pioneer Woman's version of allrecipes.com (my previous favorite recipe site). Right now I prefer tasty kitchen because I'm not asked to become a paying member every time I search for a recipe. Sorry, allrecipes, but it gets annoying.

Anyways, I found this recipe for Chicken Provolone Roll Ups and decided to try it for it company. I have to say, it's amazing! It didn't turn out so pretty, so I was glad that our company cancelled (is that bad? I think it's bad.) but boy howdy is it delicious, and so easy!

Ingredients

  • 4 pieces Chicken Breast, Pounded Thin
  • 8 slices Provolone Cheese
  • 8 Tablespoons Seasoned Bread Crumbs
  • 8 teaspoons Parmesan Cheese, Grated
  • 1 bottle (8 Oz. Bottle) Italian Dressing

Preparation Instructions

Mix bread crumbs and Parmesan cheese together. Set aside. Put 2 slices of provolone cheese on each chicken breast. Roll breasts up jelly roll fashion; dip each in dressing, then in the bread crumb mixture. Place in a Pyrex dish sprayed with non-stick spray. If necessary, to keep the chicken from unrolling, place a toothpick in each chicken breast. Bake at 450 degrees F for 25 minutes.

Saturday, January 2, 2010

Bacon Jalapeno Bites


I created this recipe for a New Years dinner appetizer by altering Pioneer Woman's Jalapeno bacon thingies. It's very easy, but very tasty!

12 Jalapenos
8 oz cream cheese, softened
1/2 Cup Mozzarella cheese, finely shredded
1/2 Cup provolone cheese, finely shredded
1 lb bacon, cut into thirds
1/2 teas onion powder
1/4 teas salt

Wash and halve Jalapenos, removed seeds and membrane. Dry on towel. Mix Cheeses and seasoning until well blended. Fill each Jalapeno half with cheese mixture. Wrap with a bacon strip and secure with a toothpick. (try to make them prettier than mine, I was experimenting to see which way the bacon worked best. Turned out to be when it was wrapped around the entire pepper and secured with toothpick!) Bake at 350 for 30 minutes, or until bacon is browned and cheese is browned and bubbly. Drain on paper towels for a few minutes before serving.

Happy New Year!